Midjourney: A Beginner's Guide 2026 — How to Use It
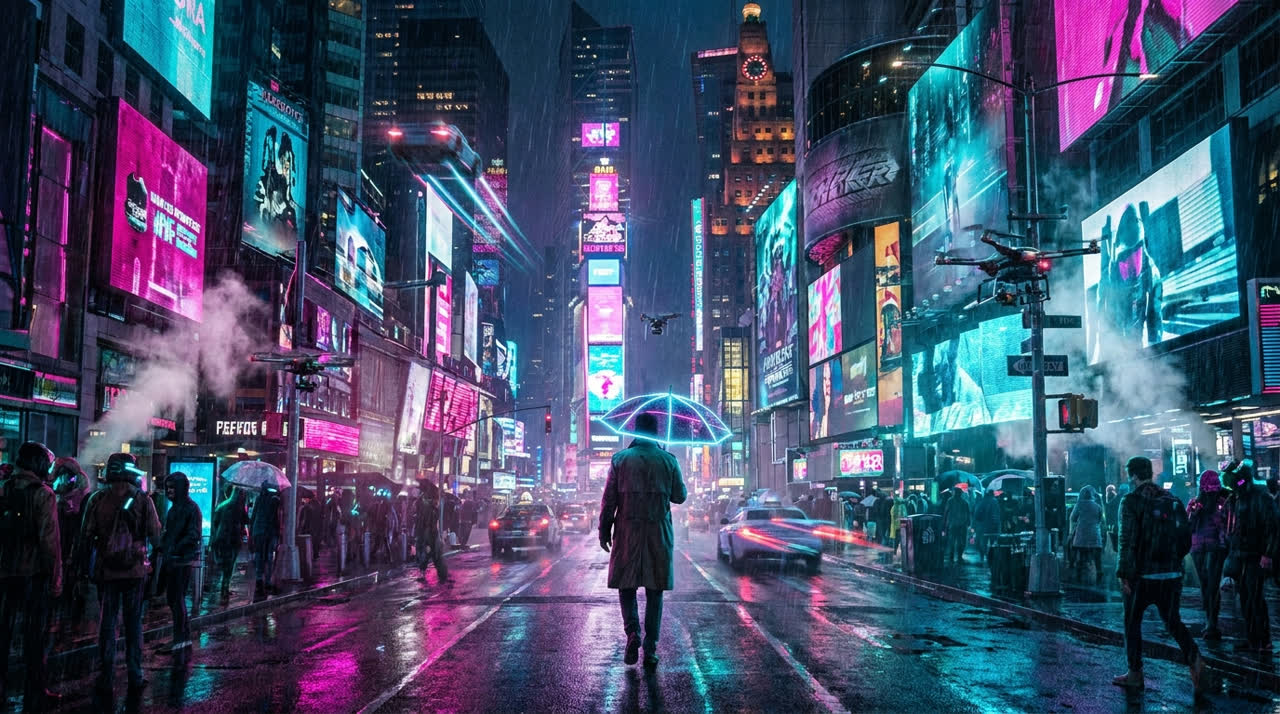
Midjourney is a neural network that draws images from a text description. You write in words what you want to see, and a few seconds later you get four image variants. Today it is one of the most powerful tools for AI art: it is used to make concepts, posters, covers, advertising frames, and — especially important for us at AIVFX — reference frames for AI video. In this guide we break down Midjourney from scratch: where to run it, how to write prompts, which settings a beginner really needs, and how to get a moving clip from a static picture.
What Midjourney Is and Where It Is Available
Midjourney works on the "text to image" principle (text-to-image). You give a description — it is called a prompt — and the model generates an image. No Photoshop, brushes, or layers: all the work goes through text and a few parameters. As of 2026, the main working version of the model is V7, and in April 2026 an even faster V8.1 appeared on the site, which better understands prompt details and can output images in 2K resolution right away, without a separate upscale.
Midjourney used to live only inside the Discord messenger — which scared off many beginners. Now there are two ways to work, and both are included in a single subscription:
- The midjourney.com website — a convenient site with a gallery, setting sliders, and an editor. Registration via a Google account, everything is visual. This is the recommended path for a beginner.
- The Discord bot — the old way through commands like "/imagine". It offers more automation and a live feed, but requires getting comfortable with chat commands. Experienced users often stay on it.
The advice is simple: start with the site. It runs the very same model, the same features, but instead of memorizing commands you just click buttons and move sliders. Uploading your own image as a reference on the site is a couple of clicks, whereas in Discord you first need to host the picture somewhere, copy the link, and paste it into the prompt text by hand.
Registration and First Launch — Step by Step
Let us break down step by step how to make your very first image through the web version. Midjourney has no free tier in 2026, so you will need a paid subscription (more on prices below).
- Open the midjourney.com site and click "Sign In". Log in via a Google account or Discord — there is no need to invent a separate password.
- Subscribe. To start, the basic plan is enough — it will be plenty to try out the tool on hundreds of images.
- Find the input field at the top of the screen — this is the prompt line. This is exactly where you write a description of what you want to get.
- Enter a simple description in English, for example: "a cozy coffee shop interior, warm morning light, cinematic". Midjourney understands English noticeably better than Russian.
- Press Enter. In 30–60 seconds a grid of four image variants will appear.
- Choose the variant you like. The upscale buttons enlarge and add detail to the picture, the variation buttons create similar versions, and the rerun button generates a new set of four.
- Download the final result — hover over the image and save it in full resolution.
A beginner's main skill is not "finding a secret prompt", but learning to iterate. The first image is almost never perfect. Generate → look → adjust the description → generate again. This way, over 5–10 rounds, you arrive at the result you need.
How to Write a Prompt — Structure
A prompt is not one word, but a description of a scene. The more specifically you tell the model what you want, the more accurate the result. It is handy to keep this structure in mind: subject → action/pose → environment → light → style → technical details.
Compare. A weak prompt: "a woman". A strong prompt: "a young woman in a red wool coat, walking through a foggy Parisian street at dawn, soft diffused light, 35mm film photography, shallow depth of field". The second version sets the heroine, clothing, action, location, time of day, the character of the light, and the shooting style — and the model produces a far more meaningful picture.

A few practical rules for a beginner:
- Write in English. The model is trained mostly on English descriptions. If you do not know the language, translate the prompt through any translator — that is a normal practice.
- Specificity matters more than length. Do not pour out dozens of adjectives. Five precise words ("golden hour", "overcast", "neon") are better than twenty general ones.
- Describe light and style separately. Light ("backlight", "soft window light") and style ("oil painting", "3D render", "photorealistic") have the strongest effect on the mood of the frame.
- Strip out the excess with Raw. If you want photorealism without the model's "artistic" auto-processing, the newer versions enable a Raw mode — it removes the default stylization and follows the text more precisely.
Key Parameters — What You Really Need
Parameters are short commands added after a double dash at the end of a prompt. There are dozens of them, but a beginner really needs four. The rest are mastered as needed.
- --ar — aspect ratio. Sets the frame format. "--ar 16:9" — horizontal video and covers, "--ar 9:16" — vertical for Reels and Shorts, "--ar 1:1" — square, "--ar 2:3" — portrait. This is the first parameter worth remembering.
- --v — model version. Indicates which model to draw with: "--v 7" for V7 or the new V8.1 on the site. If not specified, the default version from your settings is used.
- --sref — style reference. You give a link or upload a picture, and Midjourney adopts its visual style (colors, texture, mood) without copying the content. Indispensable when you need to maintain a single visual language across an entire series of frames.
- --cref / Omni Reference — character reference. The most important feature for video and serial content. You upload an image of a character, and the model preserves their face and appearance across different frames. In V7 this mechanic evolved into Omni Reference — it holds not only the face but also objects and recognizable details far more accurately than before.
Why --cref / Omni Reference deserves special attention: without it, the same character in two pictures looks like two different people. And for an advertising spot or a series of frames, it is critical that the character stays recognizable from scene to scene. It is exactly this feature that turns Midjourney from a "generator of beautiful random pictures" into a tool for production.
Subscriptions and Prices in 2026
Midjourney has no free version — you need a subscription. As of 2026, there are four plans, billed monthly or annually (the yearly option gives about a 20% discount):
- Basic — $10/mo. The entry plan. A limited number of "fast" generations per month. Suitable for trying it out and doing small volumes.
- Standard — $30/mo. Adds Relax Mode — unlimited slow generation. The most popular choice for those who work regularly.
- Pro — $60/mo. More fast hours, an enhanced privacy mode (Stealth), and higher throughput for production workflows.
- Mega — $120/mo. The maximum volume for those who generate pictures in industrial batches.
All plans give access to both the site and the Discord bot, and to all versions of the model. For a beginner it makes sense to take Basic for the first month to get comfortable, and with regular work to move to Standard for the unlimited Relax Mode — it is the most cost-effective mode if you are not in a hurry and can wait a couple of minutes for each generation.
The Most Interesting Part: From a Midjourney Frame to AI Video
Here is where the very thing begins for which we at AIVFX use Midjourney as the first stage of video production. Midjourney itself does not make video — it draws static images. But these images become an ideal starting point for video models. The technology is called image-to-video: you provide a finished frame, and the neural network brings it to life — adding camera movement, facial expressions, wind, light, scene dynamics.

The working pipeline looks like this:
- In Midjourney you generate a reference frame — thinking through the composition, light, character, style. This gives full control over the "picture" of the future video.
- If the spot has several scenes with one character — you use Omni Reference (--cref) so the character stays recognizable across all frames.
- You upload the finished frame into a video model: Kling, Runway, Google Veo, or others. You write a short motion prompt — for example, "the camera slowly pushes in, the heroine turns her head".
- The video model outputs a clip of a few seconds. A full spot is then assembled from such clips.
Why is this better than generating video straight from text? Because with "text to video" you have almost no control over the final picture — the model decides for itself how everything will look. But the "Midjourney → image-to-video" combination gives you full control over the visuals at the start: you first refine the frame to perfection in a calm mode, and only then bring it to life. For advertising, where every detail and brand recognition matter, this is a decisive advantage. This is exactly how a significant part of our pipeline at AIVFX is built.
Common Beginner Mistakes
- Too short a prompt. "cat" gives a random cat. Describe the breed, pose, background, light, and style — the result will change dramatically.
- A prompt in Russian. The model gets confused. Translate it into English — it is free and immediately raises the quality.
- Overload with contradictions. "photorealism in the style of a watercolor cartoon" throws the model off. Choose one leading style.
- Ignoring the aspect ratio. You generated a square, but you need vertical for Reels — the frame will have to be redone. Set --ar right away.
- Expecting perfection on the first try. Midjourney is about iterations. One prompt run 5–10 times with adjustments is always better than one "magic" request.
- Trying to animate a bad frame. If the static picture is weak, the video from it will be weak too. First refine the frame, then animate it.
Midjourney vs. Flux, Nano Banana, and GPT Image
Midjourney is not the only image generator, and the competitors have their own strengths. Briefly, so you understand the landscape:
- Flux — excellent at drawing photorealistic scenes and, most importantly, neat text on a picture (captions, signs, packaging), which Midjourney traditionally handles worse. Good for design where letters are needed.
- Nano Banana (Google) — strong at editing and pinpoint corrections of finished images by text command: replace an object, change the background, add a detail. It is more of a "smart editor" than a pure from-scratch generator.
- GPT Image — built into ChatGPT, convenient in that you can hold a dialogue and refine the picture step by step in plain words, without parameters. It wins on convenience rather than maximum artistic quality.
- Midjourney — the leader in artistic expressiveness, cinematic quality, and atmosphere of the frame. If you need a "wow picture" as the basis for a beautiful video — it is still the first choice.
The conclusion is simple: these tools are not competitors but a set for different tasks. Need an atmospheric scene for a spot — Midjourney. Need text on a picture — Flux. Need to edit a finished photo — Nano Banana. Want to chat and adjust the picture in words — GPT Image. In real work we combine them, and Midjourney most often stands at the start of the chain as a generator of reference frames.
Let us sum up. Midjourney in 2026 is a mature tool that even a complete beginner can master: you register on the site, write a description following the "subject — environment — light — style" structure, add --ar for the format and --cref for a consistent character, and over a few iterations you get a studio-level frame. And then this frame comes to life in Kling, Runway, or Veo — and you have a ready video fragment in your hands. The "picture → motion" combination is the very bridge that turns image generation into full-fledged video production.
Need an AI video for your business?
Describe the task — we’ll send an estimate and timeline within a day. A finished video in 72 hours.
Discuss the project